DTD TUTORIAL
If you’re looking to commission a fursuit your first step is a duct tape dummy! They are basically an exact mannequin of your body (if done correctly.), and are used to make sure your fursuit will fit just right. You’ll need the help of a friend or two, and a few materials to get started!
IMAGES ARE WIP
MATERIALS
- At LEAST 3 Rolls of Duct Tape, I suggest 3M brand duct tape.
- Painters Suit Coverall (with or without hood/feet)
- Black Sharpie
- Scissors
- Broom, mop, ect (something tall to rest your arm on)
- Paper Towels OR Plastic Grocery Bags
You can get all of these materials at any local hardware store. If you’re in the US I usually buy them at Lowes.
IMPORTANT!!
You should not continuously wrap the duct tape around the individual. It should be pre-cut into small 7-12 inch long strips and placed onto the person. You’re aiming to capture the shape of their body; it should NOT squeeze, cut off any circulation, or restrict breathing.
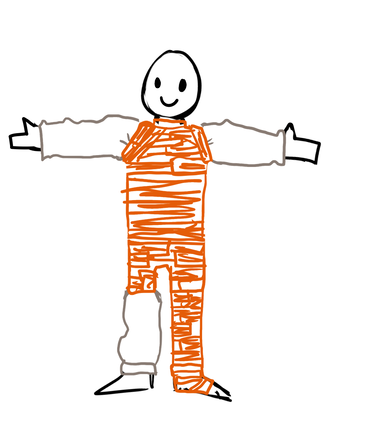
The most important places to capture on a duct tape dummy are your armpits, ankle, and groin. If these areas are done incorrectly your fursuit could possibly fit incorrectly. To make sure they are done correctly you must make sure the painter's suit is as flush to the body as possible, and your arms are held out in a T pose.
The person getting their DTD done should take care to make sure to NOT lock their knees. This can result in injury.
You will only be taping 1 leg and 1 arm for this DTD. Please make sure they are on the SAME side. It can be either left or right, but they need to be on the same side. (Left leg and left arm, not left arm and right leg).
|
STEP 1
Change into lightweight non-expensive clothing such as pjs or any old t-shirt and shorts. You can also just wear your underwear if you’d like. You may accidentally cut into these pieces of clothing when your friend cuts you out, so don’t wear anything you wouldn’t want to get damaged. I usually wear an old t-shirt and exercise shorts.
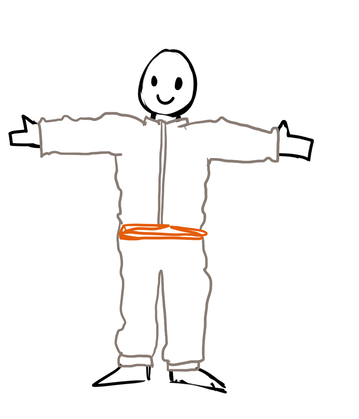
Put the coverall on over these clothes, and pull it up flush with your groin. Create a duct tape belt around your waist to hold the coverall flush to your groin. |
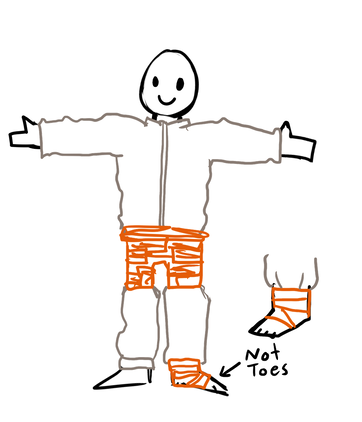
STEP 2Create a small pair of “boxers” out of duct tape on the person. Once again take care to not make it too tight.
|

|
|
STEP 3If your coverall did not have little feet, get a plastic grocery bag or paper towels and wrap them around ONE foot.
Duct tape around the person’s ankle and midway down their foot to create an almost ankle cast look. You do not need to duct tape all the way to the toes; you can stop mid-way at the foot. This is done to make sure the calf of your fursuit fits flush with the footpaw. Stop slightly above the ankle. |
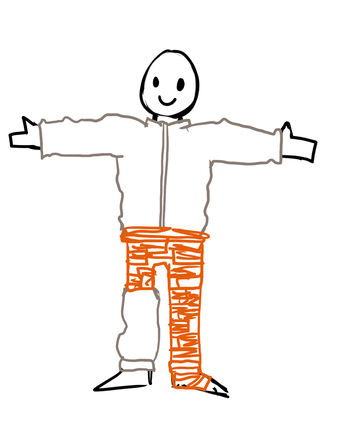
STEP 4Whichever side you duct taped the foot and finish duct taping that entire leg all the way up to the boxers you made earlier. You will need to only duct tape ONE leg. You will only be duct taping one side of your body. Please make sure the side with the foot, arm, and leg are the same!
|
|
|
STEP 5
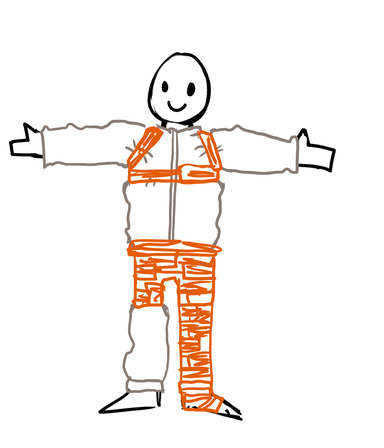
Bring the painter’s suit flush to the person’s armpits. It may be baggy in the chest area and pull the wrists up too far, but do not worry. Support the person’s arm out in a T pose by holding a broom or tall object. Make sure that it is at a nice 90 degree angle.
Tape a small harness around the entire person’s chest. Across the front, and around the armpits on both sides. Once again be sure the armpits are flush to the body but not TOO tight. |
STEP 6Tape the entire torso and back all the way down to the duct tape shorts. If the coverall has a zipper tape OVER the zipper. Leaving a zipper untapped can result in a stretched, distorted DTD and a false middle line for the maker.
If your coverall does not have a neck, place some paper towels up the neck and tape up an inch or less. It does not need to go far up the neck, just enough to accurately define it. |
|
|
STEP 7
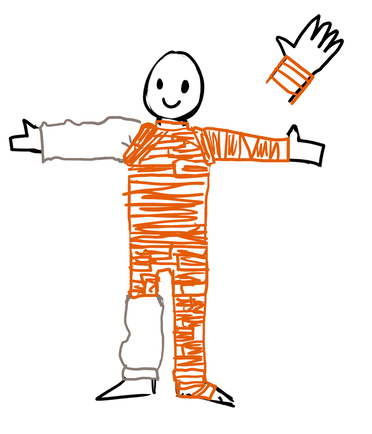
Tape the ONE arm from armpit down to wrist. It needs to be taped on the SAME SIDE as the leg. Make sure the arm is still held in the T pose position being supported by a broom taking care to make sure the tape is not too tight. When you reach the wrist you’ll notice that the coverall may have been shortened. Place some paper towels at the person’s wrist and tape all the way to where their wrist ends.
|
STEP 8
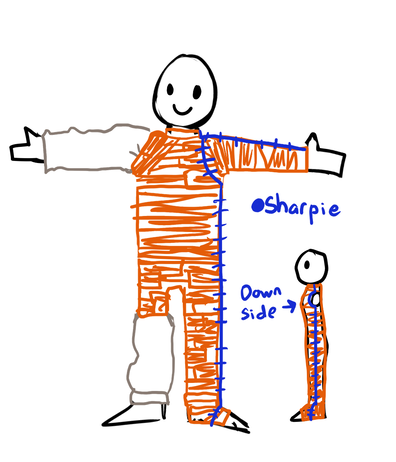
Now you’ll need to draw cutting lines to exit your DTD. With the Sharpie draw a line from the neck all the way to your wrist, around ONLY the front of your shoulder connecting to the arm line (do not cut off the entire arm), and down your side along your hip all the way to the bottom of your foot. Draw small hash lines along these markings. This will help you line it back up when you tape it closed.
Follow these lines very carefully with a pair of blunt scissors. Medical grade scissors are the best for this. Be careful to not poke or cut the person or their clothes while you’re removing them from their DTD. This can take a while, take your time. I like to start by going up the foot to the knee, and then going from the wrist to the elbow to free the person’s joints. Cut along the rest of the lines from there. It’s finished! |
|
FINISHING STEP
Re-tape your DTD closed using the hash lines drawn to make sure it aligns perfectly.
Write the character’s name, your legal name, and the date the dummy was made on the chest of the DTD.
Now it’s all done! You can now mail it off to your maker. If you live in the US the USPS priority flat boxes usually work great for these.
Write the character’s name, your legal name, and the date the dummy was made on the chest of the DTD.
Now it’s all done! You can now mail it off to your maker. If you live in the US the USPS priority flat boxes usually work great for these.
